Monday, June 1, 2009

Personalized Walls

Wow?!  Has it been a month.  It has.  Well, May kept me quite busy - my hubby and I escaped to Jamaica for eight days about two weeks ago - it was amazing.

But now I have more pressing things to discuss: 

I know you've all been waiting for the unveiling of my very own Dali Decal!  We affixed the decal to our basement wall recently - and I cannot be more pleased!  And application was SUPER easy...the hardest part making sure everything is level.  
          

I was also recently inspired by a friend of mine at work, Kristin, when she shared this monogrammed inspiration with me:

Such a fantastic idea.  I am all about the monograms.  But to put it on your wall?  How simple - easy - even better than a decal!  This creation made out of what appears to be trim wood has dimension - where decals do not.  I am already considering variations on this:  How about painted chocolate brown molding and letters off of a tan wall?  OR - the background inside the frame painted a cocoa brown to make the initials pop off the wall.  I cannot wait to employ at our house...I'm thinking in the Dining Room...
Thanks for sharing, Kristin!  And KUDOS to your friend/family member that has this on their walls - very creative, simple and dare I say - shabby chic?

Wednesday, April 29, 2009

Lighting the Web

I've met a new friend in the blogosphere, who has been very complimentary of my blog.  Here little piece of this business is this FAB lighting site - with all sorts of deals.  I am already coveting many chandeliers and fixtures on this site...

Come the time to get new fixtures in my foyer, dining room and kitchen - I'll definitely be giving them my business!  Check them out: they are Quoizel Lighting and they are Lighting the Web with style and variety!  Thanks for checking out my site!  Please come back often!

Table Me

I believe that I have failed to share my additional Nadeau purchases to round out my entry way - and half bath.

Nadeau never fails me.  I purchased this beautiful table that now resides in our entry way - under one of my favorite pieces of wall art:

And look at the beautiful finish - deep dark, just makes me want to dive right in:

All for the bargain price of $171.  You can't beat it.

Another table I purchased at the time for a measley $75 - fits so nicely in my guest bath.  It was missing something - and this black table fit the ticket (and my wallet).

I love the detail on this table - handmade furniture has so much character.

Again - stay tuned for my Dali decal debut!

Thursday, April 23, 2009

BHG Shout-Out

Gotta give a shout out to one of my favs: Better Homes and Gardens.

Some great tips here on decorating with quirky, vintage items. My friend Aharon will appreciate these, I'm sure!

I need some more items for my bookshelves - I might head on out to Ebay and see what I can find! Any great Atlanta-area stores that anyone can recommend for vintage decorating finds? Come one, come all!

Stay tuned - I DID order my own personal wall decal for our basement from Dali Decals - it has been shipped - and I can't wait to get it and hang it up!

Monday, April 13, 2009

Decals, Take 2

Further research unturned another fabulous site for decals:

I found this fun one as a front-runner for over my toddler's bed - but in navy:
They can even make it in customized sizes!

And we could also educate him a little with the ABC's:


Or perhaps I should monogram his wall:


I can see it now - Henry Chaney - est. 2006!


Now that I think of it - the above decal would look great in our basement! Uh oh, I smell an online purchase coming on...

What is Blik?

A co-worker of mine turned me on to this site. I'm INSPIRED! The site features graphics/decals that can be placed on walls. All of them are removable - a particular line of theirs can even be reused after removing!
Our new toddler room has emptiness over the bed - as i was concerned that he would knock anything I might hang there off the wall. BUT decals would be GREAT!

http://whatisblik.com/
Some of my favorites:

Each month, the blik team selects and posts some of their favorite Threadless tee shirt designs and asks the people which ones should be the next blik design! This one is based on Byebi by Tan Wei Hau.


This one is cool b/c it is a bunch of ovals that you put together to make your own Gerber daisy!


Sunday, April 12, 2009

Practical Application

Better Homes and Gardens inspires me in new and fun ways ALL THE TIME.  We've repainted and rearranged the guest bedroom - I have a long wall that can be seen from the hallway that needs something dramatic.  THIS WOULD BE A GREAT IDEA - and I also have what seems like miles and miles of empty walls in our basement that could be a contender for this fabulous idea!

So cost effective and unique:
Painted Ceiling Rosettes as wall art!  PERFECT!

Tuesday, April 7, 2009

A Room to Grow In

Well, you know your child needs a new bed when you walk in one night to find this: 
So, we took this as a clue that it was time to re-do his room! TWIST MY ARM, right? Anyway - we decided to move him in to another bedroom altogether and leave this bedroom/nursery in tact for the next child...(nope, not preggers - just planning ahead!).

I really wanted to create a room that he could use for many many years to come without having to re-do/redecorate as he grows older. So - we went for Sophisticated Toddler...with a Star Wars spin!
   
The wall color: Benjamin Moore - Hillsborough Beige
Such a fantastic neutral/khaki color - not too golden, not to grey. I highly recommend!

A more substantial bed (most likely a bunk bed) is in the future for our little man - but for now the bed remains simply on a bedframe.

The furniture: Refinished (painted) furniture that used to reside in our bedroom.  Color: Benjamin Moore, Stunning 
See this post

The bedding: Quilt - Joshua Bedding, Pottery Barn Kids; Sheets - Star Wars, Pottery Barn Kids
(of course - The Barn wins me over once again)

Lamp: Sports Lamp - $29.99, HomeGoods 
(LOVE this store!)


Sailboat on Wall: $25, HomeGoods
My husband's touch

Multi-Sports Canvas: $40, HomeGoods


Cushioned Map of the USA, $75 Pottery Barn Kids Outlet
Carried over from his old bedroom - I got this at the PBK Outlet about a year ago.  It has pins that you can put in for the places you've been. 


With the addition of a bunk bed, a book rack for the wall and maybe a chair in the corner - I think this room is all set for the long haul.  No need for full redecoration until we ship the kiddo off to college!  Once he becomes a teenager, I bet the sports canvas will have to go...and maybe a new lamp will be in order - but all in all - it's a great room to grow in!

Thursday, March 26, 2009

Furniture Makeover

For the second time in my tenure as Chief Designer of our home, I have given - let's nicely term it - mature furniture a makeover. My first endeavor was to turn my childhood bedroom furniture (white with blue trim and stenciled flowers) in to a sophisticated guest bedroom set. 

For any of you who can remember this far back - before we sold our old house, we put our old bedroom set in to storage in place of our Restoration Hardware investment! Since we settled in to our new house - it was time to resurrect our old bedroom set and give it a facelift as a cost effective furniture solution for our toddler who is in desperate need of a big-boy bedroom! I'll save the details of decorating his new room for another post - but I will give you a step-by-step guide to turning old, scratched and mildly beat up furniture in to virtually brand new furniture!

Step 1: Fill in any scratches or gouges with wood filler. Allow to harden for at least 24 hours.

Step 2: Lightly sand furniture surfaces of wood (my hubby used 220 grit sand paper). Pay attention to areas where wood filler was used - sand these carefully. You shouldn't feel any difference in the wood where you have used filler when you run your fingers over it - it should be smooth perfection!

Step 3: Depending on your wood tone/color of furniture - apply 1 to 2 coats of primer. We used a grey primer for darker colors - since we painted the furniture a navy blue color. Allow to dry for at least 24 hours.

Step 4: Apply two coats of semi-gloss paint. A semi-gloss finish should be used to ensure durability and easy cleaning/wiping. Allow 24 hours for drying in between coats.

Step 5: And this one is controversial - Home Depot (and other paint shops) will tell you that a clear, top-coat is not necessary when using semi-gloss paint. They will even go so far as to say that it will cause you more trouble applying it than anything else. My husband is convinced that they don't recommend it because they don't sell it. Coincidence? I think not! Anyway, I used a coat of Minwax Polycrylic on top of the first set of furniture I refinished - and it not only gives the paint a nice sheen, but has protected that furniture against all chips and scratches. The last thing you want is for your furniture to chip, making it look cheap and unfinished. Even if it seems to be overkill, I highly recommend at least one well-applied coat of Polycrylic clear-coat. It doesn't even take as long as one coat of paint to apply - and will be well worth it to prevent against chips/scratches that can occur due to daily use. Refer to directions on can - allow to dry for 24 hours.
If your furniture was like mine, it has old - and somewhat ugly - drawer pulls/knobs. I went to Target and got a set of 20 for $20! It was a deal - and they look great on the furniture. TIP: New drawer pulls/knobs can do wonders just about anywhere! They could also be used on kitchen/bath cabinets to give a quick and inexpensive lift to an out-dated room.

Big-Boy Furniture complete!

Before:
Note long dresser in the above pic.
After:


For more fun ways to makeover/enhance your home with paint, click here for Better Home & Garden's tips! I'm partial to their fabric makeover ideas and the chair back name cards! OH - and on page 13 - they DO recommend TWO coats of polyurethane be applied to painted furniture! Take that, Home Depot!

Wednesday, March 25, 2009

Window Furniture

The windows off the back of our house have been naked since we moved in. This wasn't too big of a problem when we moved in - until the leaves fell off the trees - giving our somewhat-distant-yet-close-enough neighbors a potential peek in to our lives in the evenings. Not to mention, the sun absolutely bakes our furniture around 1pm every day. Sooo, six to eight weeks ago I ordered plantation shutters for our family room, guest bath, and kitchen windows. They were installed yesterday! In the family room and guest bath, we did full panels. However, in the kitchen, we have a great view of our wooded back yard that I didn't want to completly eliminate. I opted for cafe-style shutters in the eating area - which are shutters that only go half-way up the window - allowing for privacy while the much wanted light still pours through.

Kitchen shutters below.

Family Room:


This truly is window furniture. Plantation shutters really give a room a finishing touch - very contemporary and streamlined, in my opinion - even though they are considered to be a somewhat traditional fixture. Call me crazy - but for some reason - and I could be imagining this - they make the areas that surround feel bigger. Is that due to the horizontal lines? The same way that horizontal stripes can make your hips and butt look big? I don't know - but I'm liking it!

Thursday, March 5, 2009

Safe Haven

So, I took yet another online quiz at Better Homes & Gardens on what style bedroom is best for me. I've recently made a mistake in painting our bedroom - I was going for a khaki/coco color - and ended up with a color that was much too golden-tan. A perfectly fine color - but was not the shade I was aiming for. We have an upholstered, natural/cream colored bed - I was looking for a little drama of a darker coco color. So, I've settled on another color (that I love) called 'Hopsack' from Duron...we just haven't had the chance to repaint (my wonderful hubby has pledged to do so - he is eager for me to be happy with the bedroom - and to finally hang up our pics/wall art!) Hopsack is actually the same color that I painted on the back of our bookshelves in the living room....


But now that I've taken this quiz - I'm wondering if I shouldn't shoot for a restful, organic green color? Apparently the style bedroom for me is 'Safe Haven.' Which is no surprise - my bedroom needs to be a restful retreat for me and my husband to escape. I think I'll stick with the not-too-dark cocoa shade I've chosen to repaint...but read below for the results of my quiz!


Safe Haven

At the end of the day, you like to escape from the world (including the rest of the family!) to relax and recharge, and it sounds like your bedroom is your retreat of choice. With the hectic pace of life today, you're smart to carve out an area of serenity. To make the most of your getaway space, put in carpet that feels good on your feet, splurge on luxurious high thread count sheets, and invest in window treatments that will allow you to block out the light and noise of the world outside your window. When it comes to color, choose restful greens or blues for a peaceful feel. If space allows, add a comfy chair where you can sit to flip through the mail or read a good book. Treat yourself to a fabulous cashmere throw that you can curl up with when the weather turns cold. Surround yourself with other items you love, like favorite family photos, softly scented candles, and artwork you adore. Finally, hang a "Do Not Disturb" sign on your door and let the relaxation begin.

Color Personality


So, I took an online quiz today at Better Homes & Garden's website. Turns out my personality color is yellow! And I used to have our master bedroom a yellow color - but now, a yellow-gold is an accent color in our house....BUT, I am getting ready to paint our guest bedroom a golden yellow color - so it makes sense! Yellow goes with many of the earthy colors - so it is quite versatile!

What is your color personality??

Wednesday, March 4, 2009

Vampire Love


So...I completed my decorating classes to promptly be swept up in the rapture of teenage vampire love. I have recently become captivated by the Twilight saga written by Stephenie Meyer. This series of books has prompted me to top my all-time reading record set while traveling the London tube for a week (on business) between Glouchester Rd & Heathrow airport reading and completing the sixth Harry Potter book, The Half-Blood Prince, in five days. And this all while I put in an eight hour day at the office! I really miss my London trips - but I digress. Anyhoo, I completed the first book, Twilight, a little slower - in eight days. However, I finished Twilight on Sunday, began reading New Moon on Sunday afternoon - and then FINISHED New Moon on Monday (or Tuesday) at 1:30am! That is two days folks! AND, I worked a full day on Monday and didn't begin the book on Sunday until 4pm! THAT IS A RECORD. And I owe it all to my glorious, wonderful Edward Cullen. Be still my heart. (Honey, don't worry - I love you. And once I complete book 4, you'll have your wife back!)


I'm in the midst of Eclipse (book #3)...and probably should slow down! I don't want it to be over - there are only 4 books! So - what does it say about me that I cannot put down a book that is meant for teenagers??? Whatever! I still love Britney too! I shall embrace my inner tweenager that is bursting to get out!

Friday, February 13, 2009

Tada!

After much ado...
At long last......

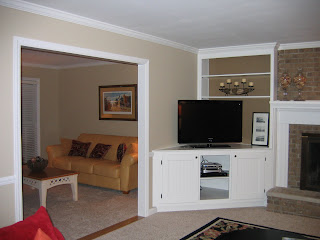
Pictures of the finished family room:  Sans solid wall, plus built-in cabinet, minus stained wood trim.

BEFORE:


AFTER:


BEFORE:


AFTER:

My first pass at the shelf makeover.  I need a few more books - although, I do not want it to be too busy.  Notice I painted the back of the shelf a deeper color than the walls throughout the room.  I couldn't be happier with this effect.

More to feast your eyes upon...the cabinet up close.


The wall - BEFORE (not our furniture):

AFTER:
The view from the front door, BEFORE:
AFTER:


We're very happy with the results. Both rooms are so much more open and bright.  Just painting the trim in the family room has been amazing.  For the first few days, all I could do was walk in the room and stare.  Money well spent.

As you can see, I'm still grappling with the mantel.  I'm leaning towards not putting a picture there - but perhaps arranging decorative pieces, instead.  Shelf/mantel do-over is a work in progress.  I move something else each day.  Will it ever be perfect?  Probably not...it's fun to rearrange!

My Evenings at Emory

So, last night I had my second class in Design Basics at Evening at Emory. The class is taught by Lee Anne Culpepper, a 26 year veteran of the home design business. I have to say she is fantastic. I also have to say that I apparently know more than I thought I did going in to this course! I'm learning all sorts of new things, but am also confirming some of what I thought were instincts, but now know is pure-bred decorating talent! So far it's been a great experience - and with two classes left - I cannot wait to learn more!

Some tidbits from the past two classes that I have learned:

"Rules of Thumb"
  • Chandeliers: hang 27"- 36" inches above tabletop
  • Shower curtains: hang at least 12" from ceiling. Curtain should also almost reach the floor.
  • Rugs - under a table: all chair legs should rest comfortably on the rug when pushed in to the table. Ideally, when pushed back, the legs would remain on the rug. However, this a rule you can break in small spaces.

We've also learned some tips for decorating small spaces - like using glass tables in a small eating space to make the area look bigger. Painting the back of a built-in-shelf can add interest and a colorful background off which accessories can pop! (Hmm...sounds like a great idea. Must be why I've already done this in our living room!) I've also learned that my decorating style is ecclectic - which is a combination of several styles. I think that my particular combination is Colonial/Contemporary/Tranditional with a splash of country. Shocked that country is in there - but I have a love of painted furniture - which is an attribute of the country style.

Next week we will be learning about wall art - how to frame, arrange, create, etc! We'll also be discussing fabric options to make a room coordinate, but not be too matchy-matchy. Can't wait to sign up for Design Basics II!!

I've been working on my shelves in the living room since our construction is now complete. I'll post pics of the finished product and the shelf arrangement that is still a work in progress later this evening. Trial and error when decorating shelves is DEFINITELY a necessity! And it's so fun!

Monday, February 2, 2009

Mantel Worthy?

If you've been following along the last few months, you'd know that I've been grappling with what to put on my mantel. This decision has been somewhat stalled lately, as I've been waiting to see what the mantel will look like once it is painted. As you can see below, this transformation is imminent - so I've been beating the streets to figure out what I should place on this coveted and high profile position in our family room.

This item will be one of the first things that people see upon entering our front door - now that our wall is open. I've been looking for something a little more personal than just any old canvas print (it must be canvas b/c our spotlight above the mantel casts a nasty glare on anything framed in glass.)

My love affair with Rodney White is ever-burning these days (don't tell my husband.) And I have discovered his letter Artaissance giclees. How about 'L' for our last name:

Our sofas are red - and there is some red in the area rug....no teal just yet - but I think this could be a great opportunity to incorporate this color. I love how the right shade of teal looks with red. The question remains - is it mantel worthy?

This pic is from an earlier version of our progress on the wall opening - but gives you an idea what you'll see when you enter our front door. The mantel is front and center - picture it in white/cream instead of the stained wood below. Honest comments? Please provide!

Progress, Take 2


Another shot for your consumption (excuse the poor pic quality - taken from my blackberry!). The room is beginning to take shape! Painting should be complete by tomorrow! After which I get to take the book shelf makeover by storm! I've been collecting books around the house, and taking off their covers. I'm even considering buying some old ones from used book stores! And I've purchased some fun items to place sporadically amongst the books. I'm excited about this one!

More to come!

Thursday, January 29, 2009

Progress


Please excuse our mess, construction in progress! Finally - my cased opening between the living room and family room, and our new cabinet for our TV are underway! Stay tuned.

Wednesday, January 21, 2009

Weekend Projects

I opened my email this morning to find a wonderfully helpful email from Better Homes & Gardens that included 20 Winter Weekend Fix-Ups.  SUCH helpful ideas - I cannot even explain.  I plan to deploy some of these projects in my own home.  The first one I plan to undertake is:

I have posted pics of my family room - with built-in bookshelves - before.  And I have been struggling with how to decorate them - not wanting to overclutter - but also not wanting to have a sparse feel to them.  Below are pics of their current state:


Can't wait to have a cabinet built to hide that TV equipment (in the next two weeks)!  Somehow I don't think BHG would be pleased!  There cannot be an easy way to make a cable box look chic!

Some of BHG's helpful hints for updating your bookshelves include:
- Alternate stacking books vertically and horizontally
- Use framed pictures as bookends
- Place figurines on horizontal books, and layer books behind
- Remove book jackets to tone down the various colors and patterns
- Less is more!  Arrange books here and there with pics and accessories in between.  
- When stacking books, arrange from tallest to shortest
- Vary heights by stacking books as base for accessories
- Paint your shelves a bold color so that they become the focal point as opposed to the disparate color and pattern of your books

Some great examples of these techniques are below:
                                                                

We are having work done in our family room in the next two weeks - that will end in these bookshelves and the mantle being painted a creamy white color. (as well as a large, cased opening to be created in an adjacent wall to open up the front family room to the back living room - so excited)  As soon as this work is completed, I plan to get to work arranging the shelves.  And, have no fear, the pics will be posted here first!

The other weekend fixer-ups that I'd like to undertake are:
#10 - Redo Your Mantle (in tandem with the bookshelves overhaul)
#18 - Big Impact with a Little Fabric (lampshades never looked this good!)
I will create one post for each project over the next few weeks/months.  

Some other projects that are not on my short-list - but are making me think twice are:

Now you have a great way to spend these long, cold weekends we seem to be having lately! 
:)  Get creative!


Tuesday, January 6, 2009

Overstock Me!

I was reminded today of the fabulous deals one may find at Overstock.com!  I was casually perusing, when I stumbled upon this chair.  My sister has been searching for two matching chairs to put in her front living room - and EUREKA - these would be perfect!  I sent her the link - and she called two hours later to let me know she bought them.  A match made in heaven!

Slipper Chair O Vanilla

This is such a fantastic chair - and priced at $240 - it's the steal of the week!  And my next tasks for her room is to find a pedestal table for in between - two floor lamps for behind the chairs and a complementing area rug...and also to find a great color for the walls.  (the one in the pic above ain't bad!)  I'll be sure to post some before and after photos as the project comes along.

Some other favorites I found while reacquainting myself:


There is something so classy about this chair.  Gosh - I wish I could find a spot in my house for this one...I'll look in to that!


What a classy desk.  Don't look now, but based on my above pics you could say I might be in a "Neutral Phase" right now.  Not much color here - but there is something so classic and elegant about neutrals.  Can't get enough!